Credit notes and corrections
Who can do this
Section titled “Who can do this”- Company Owners and Company Admins can always create credit notes.
- Company Members can create credit notes when the Allow all Company Members to view and create invoices billing setting is on, or when they hold Client Admin permission on the client and the Allow contract and invoice management for users with Client Admin permission setting is on.
- The Credit note option only appears on invoices where the member has invoice editing rights for that client.
When to use a credit note vs. voiding an invoice
Section titled “When to use a credit note vs. voiding an invoice”| Situation | Use |
|---|---|
| Invoice has not been sent and not exported to accounting software | **Void invoice** |
| Invoice has been sent, exported, or paid | **Credit note** |
| Tax regulations require a formal correction document | **Credit note** |
| You want to cancel a draft nobody has seen | **Void invoice** |
The Credit note option is available only for invoices with status Created, Sent, or Paid, and only when the invoice total is greater than zero. You cannot create a credit note for an already voided invoice or for an invoice that has already been credited.
How to create a credit note
Section titled “How to create a credit note”From the Billing section
Section titled “From the Billing section”- Open Billing from the main navigation.
- Find and open the invoice you want to reverse (in the Created, Sent, or Paid tab).
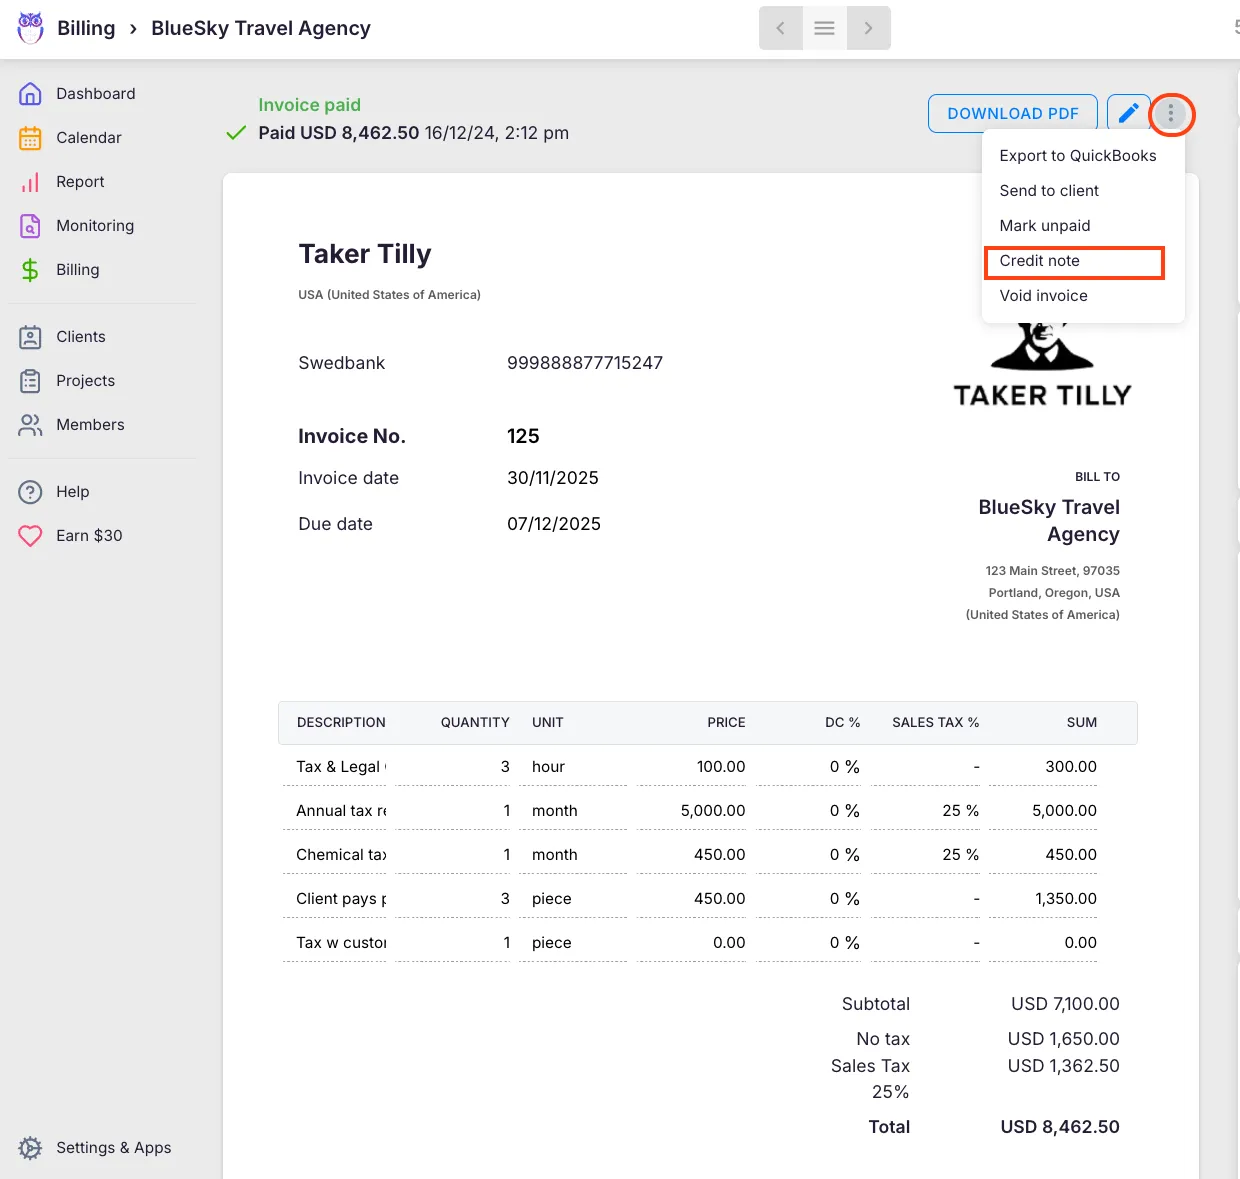
- Click the three-dot menu in the top-right corner.
- Select Credit note.
- Confirm the action.
From the client profile
Section titled “From the client profile”- Open the client profile.
- Go to Financials > Invoices.
- Find and open the invoice.
- Click the three-dot menu and select Credit note.
- Confirm the action.
What happens when a credit note is created
Section titled “What happens when a credit note is created”Uku duplicates the original invoice and applies these changes:
- All line quantities are negated — every row is copied with its quantity multiplied by −1, producing negative amounts.
- Net, tax, and total sums become negative, reflecting the reversal.
- Invoice date and due date are set to today.
- Comments are pre-filled with “Number of invoice to be credited: [original invoice number]”.
- Status is set to Created — the credit note opens in edit mode so you can review it before finalising. Send, paid, and exported timestamps are cleared.
- The original invoice is marked so that a second credit note cannot be created for it.
Partial credit notes
Section titled “Partial credit notes”If you only need to reverse part of an invoice — for example, one of several services was incorrect — edit the credit note before finalising it:
- Remove rows you do not want to credit.
- Adjust quantities on specific rows. The credit note does not have to mirror the full original. You can credit any subset of the original invoice lines.
Credit note numbering
Section titled “Credit note numbering”By default, credit note numbers use the prefix CN- followed by the original invoice number. For example, if the original invoice is INV-2026-042, the credit note becomes CN-INV-2026-042.
To change the prefix:
- Open Settings & Apps > Billing > Settings.
- Update the Credit note prefix field.
- Click Save. The prefix change applies to all future credit notes. Existing credit notes retain the prefix they were created with.
Sending the credit note
Section titled “Sending the credit note”After the credit note is finalised (status Created), send it using the same methods as a regular invoice:
- Click Send to client in the toolbar or from the three-dot menu.
- Export to accounting software using Export to accounting.
- Download the PDF using Download PDF and send it manually. The credit note PDF includes negative amounts and a reference to the original invoice number.
Troubleshooting
Section titled “Troubleshooting”The Credit note option is not visible in the three-dot menu
Section titled “The Credit note option is not visible in the three-dot menu”Check that the invoice status is Created, Sent, or Paid. The option does not appear for Draft, voided, or already-credited invoices. Also confirm you have invoice editing rights on this client — Company Members need the relevant billing permission toggle to be enabled.
The credit note has the wrong prefix
Section titled “The credit note has the wrong prefix”The prefix is set at creation time. Update the Credit note prefix in Settings & Apps > Billing > Settings before generating the next credit note. Existing credit notes cannot be retroactively updated.
Cannot find the invoice to credit
Section titled “Cannot find the invoice to credit”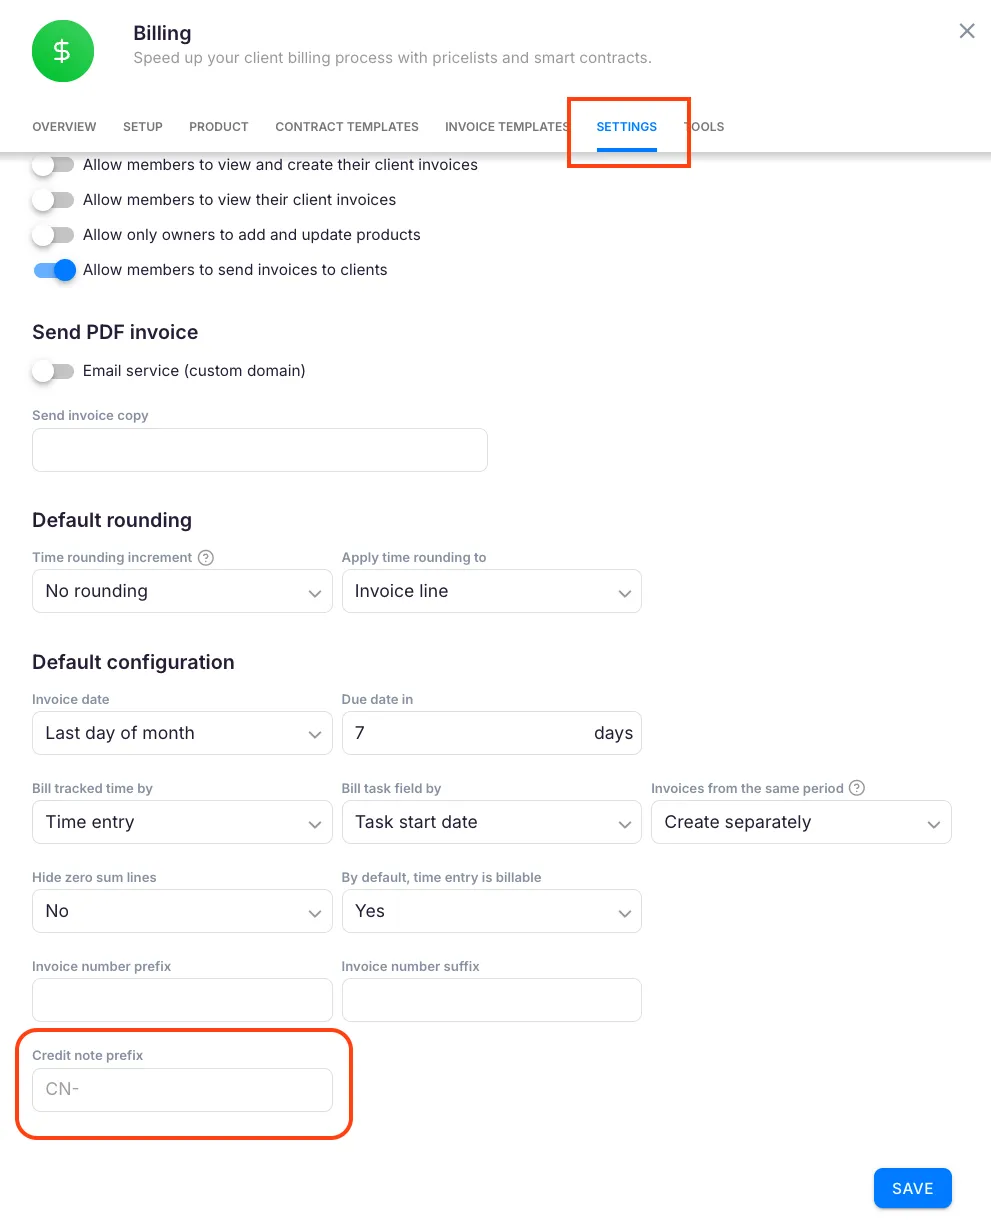
Use the search and filter options in Billing to locate the invoice by client, date, or invoice number. You can also find it through the client profile under Financials > Invoices.
Screenshots
Section titled “Screenshots”